Chocolate Pie Crust: Made in 9 Easy Steps
Last week, I picked up our bees and stopped at Sweet Berry Farm in Marble Falls, Texas, to grab the last bit of strawberries for the season. When I got home, all I could think about was a strawberry and cream pie. Naturally, I had to kick it up a notch. And what better way to do that than to bake it with a chocolate pie crust?
What is a Chocolate Pie Crust?
A chocolate pie crust is exactly what it sounds like: a classic pie crust transformed with cocoa powder’s rich, bold flavor. Instead of a plain, buttery base, you get a deep chocolate flavor that pairs beautifully with all kinds of fillings.
It’s similar in texture to a traditional pastry crust, but with an extra layer of flavor that takes your dessert from “yum” to show-stopping.
Why Choose this Chocolate Pie Crust Recipe?
It’s made with black cocoa and a little coffee, bringing a dark, dramatic color and a grown-up, bittersweet chocolate vibe. Perfect for anyone who loves their desserts with a little edge!
Chocolate Pie Crust Ingredients Worth Noting
- Black cocoa: Black cocoa is a super-dark, ultra-dutched (alkalized) cocoa powder that’s been processed to remove most of its acidity. The result? A smooth, mellow flavor with almost no bitterness—and that signature deep black color you see in things like Oreo cookies. It’s less about sweetness and more about rich, earthy chocolate notes. While you can swap it for regular Dutch-process cocoa in a pinch, black cocoa makes this crust shine in flavor and looks!
If you are looking for where to buy it, I recommend using King Arthur Flour - Cold-Brew Coffee: Coffee and chocolate are best friends in the baking world—coffee doesn’t make it taste like mocha but deepens the cocoa flavor, making it richer and more intense. I recommend using cold brew instead of hot coffee because it’s smoother, less acidic, and blends beautifully into the dough without affecting the texture. My go-to is Stok Cold Brew.
How to Make a Chocolate Pie Crust
Making this chocolate pie crust might sound fancy, but it’s approachable, especially with a food processor doing most of the work. Here’s precisely how to do it, with tips to help along the way:
Measure the dry ingredients
In the bowl of a food processor, measure out:
- 191 g. all-purpose flour
- 1/2 tsp. salt
- 1/8 tsp. baking powder
Pulse the mixture twice to combine. This evenly distributes the salt and baking powder so you won’t end up with salty or flat spots in your dough.
Tip: Use a kitchen scale if you have one for the most accurate measurements—it makes a difference with baking!
Cream the shortening, sugar, and black cocoa
In a separate bowl, add:
- 28 g. vegetable shortening
- 28 g. sugar
- 21 g. black cocoa
Use a fork or a spatula to mash these together until they look like a sticky paste. This step helps distribute the cocoa evenly throughout the crust and builds that deep chocolate flavor.
Tip: Don’t skip this step! Adding the cocoa directly to the flour mixture makes it harder to get an even color and flavor.
Add butter to the flour mixture.
Cut 113 g. cold, unsalted butter into small cubes. Add the butter to the food processor in three clumps (rather than dumping it all in at once). Pulse several times until the mixture looks like coarse cornmeal—some small butter bits are okay; they’ll create flaky layers when baked.
Tip: Work quickly here so the butter stays cold! Cold butter = flakier crust.
Mix the wet ingredients
In a small bowl, stir together:
- 2 tsp. vanilla extract (or vanilla powder)
- 65 g. Cold brew coffee (I recommend Stok Cold Brew for its smooth flavor)
Tip: Use very cold coffee to keep the butter from softening too soon.
Bring the dough together.
Pour the vanilla-coffee mixture into the food processor. Pulse until the dough starts to clump together into a ball. It might not form a complete ball in the processor—and that’s okay!
If the dough has dry patches or crumbly bits, turn it out onto a clean surface and gently knead it by hand, pressing the loose bits into the dough until it comes together.
Tip: Avoid overworking the dough; you don’t want to melt the butter with your hands or make it tough.
Wrap and chill
Shape the dough into a disc, wrap it tightly in plastic wrap (or beeswax wrap), and refrigerate for at least 4 hours or overnight. This helps the butter firm up again and allows the gluten to relax so the crust doesn’t shrink when baked.
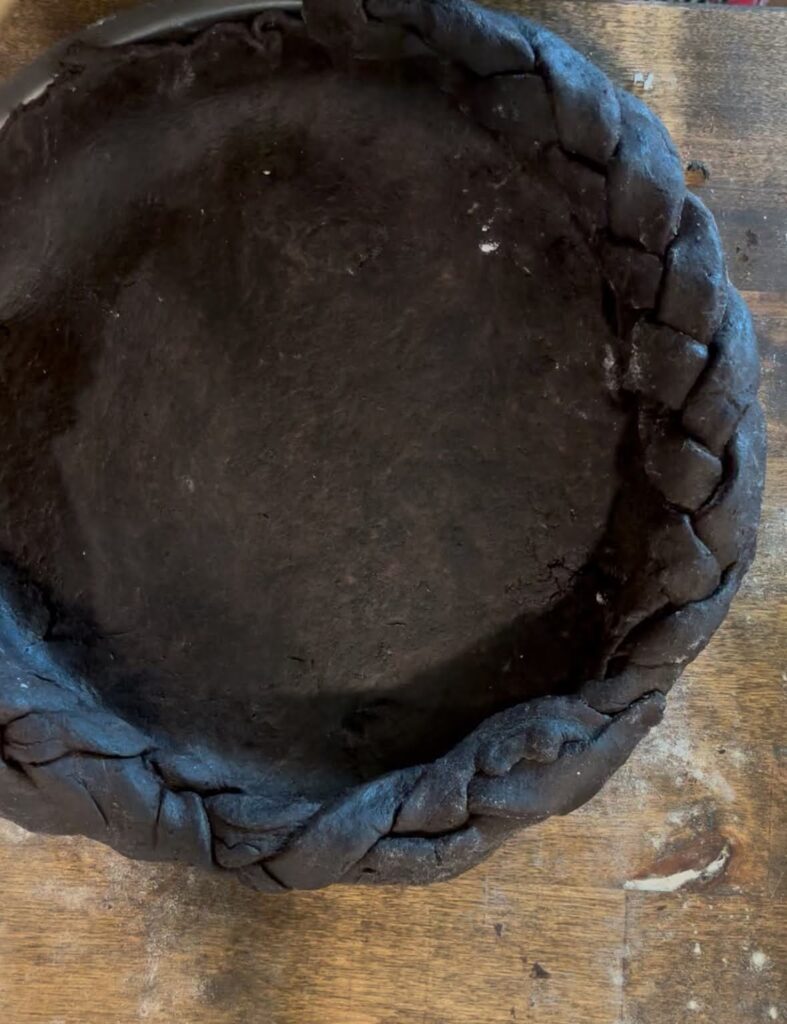
Roll out the dough
Lightly flour your work surface and rolling pin. Roll the chilled chocolate pie crust dough into a circle about 1/8 inch thick (or as thin as you prefer). Gently lift it into your pie pan, pressing it into the corners and trimming the edges.
Tip: If the dough cracks while rolling, patch it with a little extra dough and press it together—it’s very forgiving!
Blind bake if needed
If your recipe calls for a pre-baked crust, line the crust with parchment paper and fill it with pie weights or dried beans. Bake at 350°F for about 55 minutes. Remove the parchment and weights in the last 10 minutes so the bottom can finish baking.
Tip: To avoid a soggy bottom, let the crust cool completely before adding fillings, especially custards or creams.
Blind Baking a Crust
Blind baking means baking a pie crust without any filling inside. It’s an important step when your filling doesn’t need to be baked (like a chocolate cream or no-bake cheesecake), or when you want to make sure your crust stays crisp and doesn’t get soggy.
Here’s how it works: after rolling out your pie dough and placing it in the pan, you line the crust with parchment paper or foil and then fill it with pie weights (or dried beans, rice, or even sugar if you don’t have weights). This keeps the crust from puffing up or shrinking while it bakes. After it’s mostly baked, you remove the weights and parchment and let it finish baking uncovered so the bottom gets golden and firm.
Blind baking helps you get a crisp, sturdy crust that holds up beautifully under creamy, soft, or wet fillings. It’s like giving your pie a strong foundation so nothing turns out soggy!
Want Some More Great Recipes?
I plan to add the strawberries and cream recipe to complement this Chocolate Pie Crust, but for now, be sure to check out all our other great recipes!